
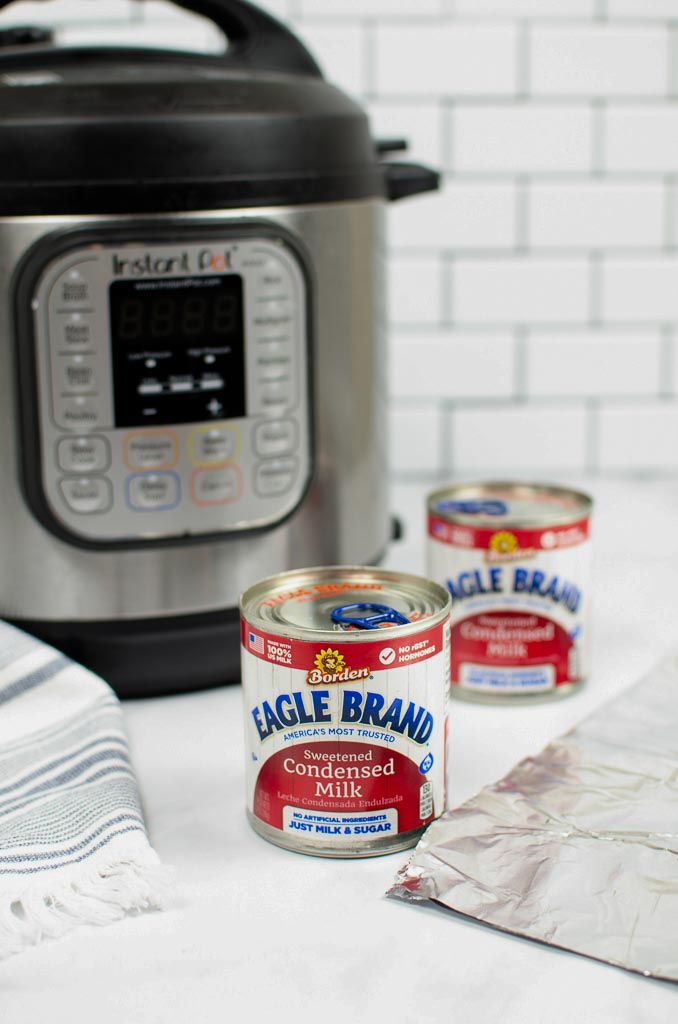
Instant Pot Dulce de Leche transforms canned sweetened condensed milk into thick, creamy caramel in just 35 minutes of pressure cooking. This simple method uses two cans of sweetened condensed milk, water, and an electric pressure cooker to create a rich caramel sauce without constant stirring or watching.
The pressure cooking process caramelizes the milk evenly and produces smooth results every time. Making dulce de leche at home gives cooks complete control over texture and sweetness while saving money compared to store-bought versions.
The process involves wrapping the cans in foil, placing them on the trivet with water, and cooking at high pressure. This article covers everything from choosing the right ingredients to storing the finished caramel and using it in desserts.
Whether drizzled over ice cream, spread on toast, or used as a dip for fruit, this one-ingredient caramel adds sweetness to any treat. The step-by-step instructions make it easy for anyone to create restaurant-quality dulce de leche at home.
What Is Instant Pot Dulce de Leche?
Instant Pot dulce de leche is a thick, creamy caramel-like sauce made by pressure cooking sweetened condensed milk in an electric pressure cooker. The process transforms the milk into a rich, golden spread in about 35 minutes of cooking time, plus additional time for the pot to reach pressure.
Difference Between Traditional and Instant Pot Methods
Traditional dulce de leche requires constant stirring in a saucepan for several hours to prevent burning. Cooks must watch the stove carefully and stir frequently as the milk slowly caramelizes.
Another old method involves simmering an unopened can in a pot of water for 2-3 hours, making sure the can stays completely covered with water the entire time. The Instant Pot method removes the need for constant supervision.
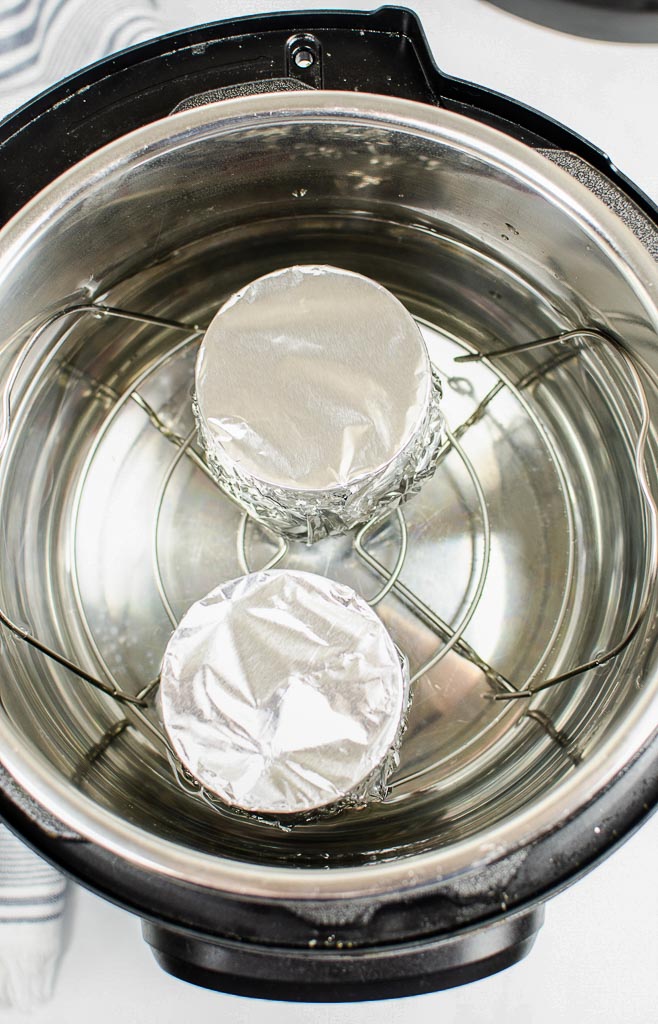
The pressure cooker maintains consistent heat and seals in moisture, which prevents burning. Cooks simply wrap opened cans of sweetened condensed milk in foil, place them on a trivet with water, and set the timer for 35 minutes at high pressure.
The pressure cooking method produces a thicker and smoother texture than stovetop versions. It takes about 65 minutes total from start to finish, including the time needed to reach pressure.
Origins and Cultural Significance
Dulce de leche translates to “sweet milk” in Spanish. The sauce has roots in Latin American cuisine, where it serves as a popular topping and filling for desserts.
Different countries claim its origin, but the preparation method remains similar across cultures. Families use it to fill pastries, spread on toast, or drizzle over ice cream.
The caramelized milk has become a staple ingredient in many traditional recipes throughout South and Central America.
Caramel Sauce vs. Dulce de Leche
Dulce de leche starts with sweetened condensed milk as its only ingredient. The milk caramelizes through long, slow heating, which creates its signature texture and flavor.
Caramel sauce requires sugar, butter, and cream cooked together until the sugar melts and browns. The ingredients combine to form a pourable sauce with a buttery taste.
The two differ in both texture and flavor. Dulce de leche has a thicker, creamier consistency and tastes primarily of milk and sugar.
Caramel sauce is thinner and has a more pronounced buttery, burnt sugar flavor. Dulce de leche works better as a spread or thick topping, while caramel sauce pours easily over desserts.
Ingredients Overview
Making dulce de leche in an Instant Pot requires sweetened condensed milk as the main ingredient, though cooks can add extra flavors to customize the final product.
Why Sweetened Condensed Milk Is Essential
Sweetened condensed milk serves as the foundation for dulce de leche because it contains the right balance of milk solids and sugar needed for caramelization. The milk has already been cooked down to remove about 60% of its water content, which allows it to transform into a thick, smooth caramel sauce under pressure.
Regular milk or evaporated milk cannot replace sweetened condensed milk in this recipe. These alternatives lack the high sugar content that creates the caramel flavor and texture.
The sugar in sweetened condensed milk undergoes a process where heat causes it to brown and develop complex flavors. The canned format makes this ingredient ideal for pressure cooking.
Each 14-ounce can contains pre-measured ingredients that cook evenly when wrapped in foil and submerged in water.
Choosing the Best Sweetened Condensed Milk
Most brands of sweetened condensed milk work well for making dulce de leche. Cooks can find this product in the baking aisle of grocery stores.
Standard sweetened condensed milk contains whole milk and sugar. Some brands offer variations like low-fat or organic options, which will produce slightly different textures and flavors.
Full-fat versions create the richest, creamiest results. The recipe calls for 2 cans of 14-ounce sweetened condensed milk.
This amount fits comfortably in a 6-quart or 8-quart Instant Pot with enough room for water circulation. Cooks should avoid using evaporated milk, as this product is not sweetened and will not caramelize properly.
Optional Flavor Additions
Plain dulce de leche made from sweetened condensed milk alone delivers a classic caramel taste. However, cooks can enhance the flavor with simple additions mixed in after cooking.
A pinch of sea salt creates salted caramel dulce de leche. Vanilla extract adds depth and warmth to the finished sauce.
A small amount of cinnamon brings subtle spice notes. These additions should be stirred in after the pressure cooking completes and the cans have cooled.
Adding ingredients before cooking can affect the texture or cause separation. Start with small amounts and taste before adding more.
Equipment and Preparation Steps
Making dulce de leche in an Instant Pot requires minimal equipment but proper setup matters for consistent results. The choice of container and attention to safety details determine both the texture of the final product and safe handling throughout the process.
Alternative Containers: Cans, Jars, and Foil Methods
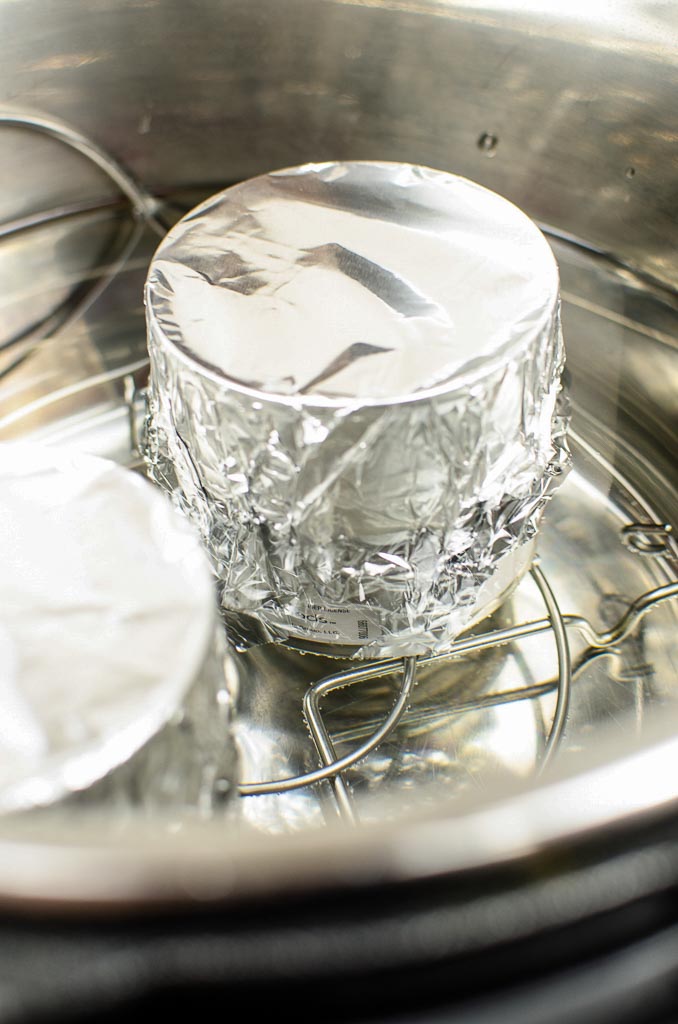
The most common method uses cans of sweetened condensed milk covered tightly with aluminum foil. The foil creates a seal that prevents water from mixing with the condensed milk during pressure cooking.

Some cooks prefer to transfer the condensed milk into mason jars, which should be left loosely covered to allow pressure equalization. Glass jars work well in the pressure cooker but must be tempered and able to handle rapid temperature changes.
Leaving jar lids slightly loose prevents them from sealing completely under pressure. Another option involves pouring the condensed milk into a heatproof bowl covered securely with foil.
Each container type produces slightly different textures. Cans create the thickest dulce de leche, while jars and bowls may result in a slightly softer consistency.
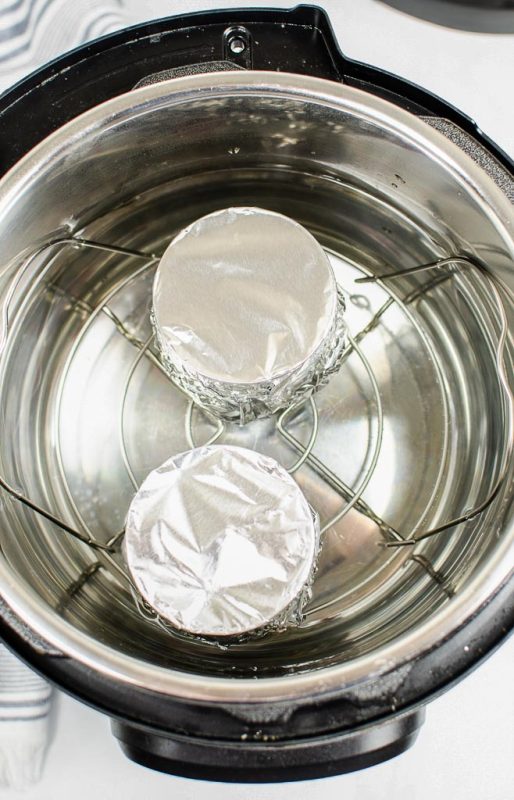
The Instant Pot trivet must be placed at the bottom regardless of container choice to keep containers elevated above direct heat.
Safety Precautions and Tips
The pressure cooker requires adequate water to function safely. Water should reach halfway up the sides of the containers, which typically means adding 3 to 4 cups.
Insufficient water can cause burning or uneven cooking. Steam poses the biggest safety risk when opening the Instant Pot.
The quick release valve releases hot steam forcefully, so keeping hands and face clear prevents burns. Both the containers and their contents reach extremely high temperatures during cooking.
Always use tongs to remove containers from the pressure cooker. A towel or hot pad provides additional protection when handling hot cans or jars.
Containers must cool completely on a wire rack before opening, as the dulce de leche inside stays hot for an extended period.
Step-by-Step Guide to Making Instant Pot Dulce de Leche
Making homemade dulce de leche in an Instant Pot requires proper setup of the cans, correct water levels, and precise cooking times based on desired thickness. Each step affects the final texture and color of the caramel.
Preparing the Can or Jar
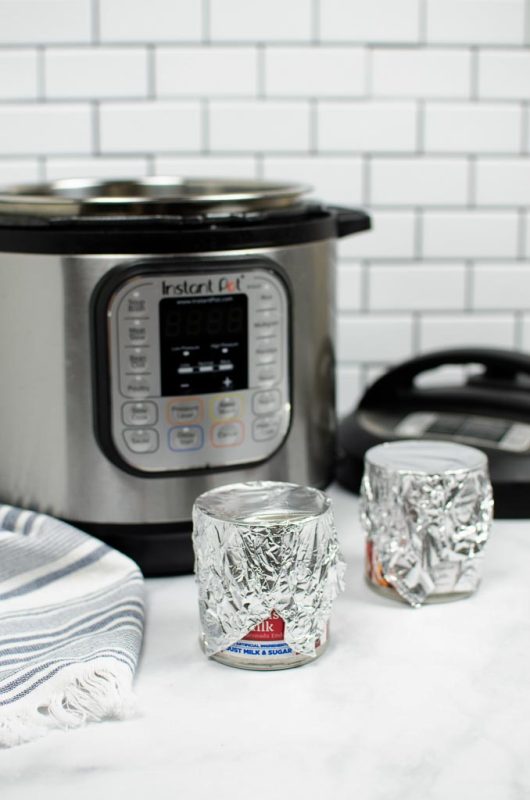
Remove the label from each can of sweetened condensed milk before cooking. The cans must be covered tightly with aluminum foil to prevent water from mixing with the milk during pressure cooking.
Some recipes call for pouring the sweetened condensed milk into heat-proof jars instead of using the original cans. This method works well but requires leaving the jar lids loose or covering with foil rather than sealing completely.
Two preparation options:
- Can method: Cover unopened cans with foil after removing labels
- Jar method: Pour milk into jars and cover loosely with foil
Both methods produce good results. The can method is simpler since it requires less handling.
The jar method allows cooks to check the color during cooling and whisk the mixture smooth if it becomes lumpy.
Proper Water Levels and Rack Setup
Place the trivet or rack in the bottom of the Instant Pot first. This keeps the cans elevated and allows water to circulate underneath for even heating.
Set the foil-covered cans on their sides on top of the trivet. Pour water into the pot until it reaches halfway up the sides of the cans.
This water level is important because too little water can cause uneven cooking or burning. The pot will take about 30 minutes to reach pressure because of the large amount of water needed.
This is normal and does not affect the quality of the dulce de leche.
Cooking Times for Different Consistencies
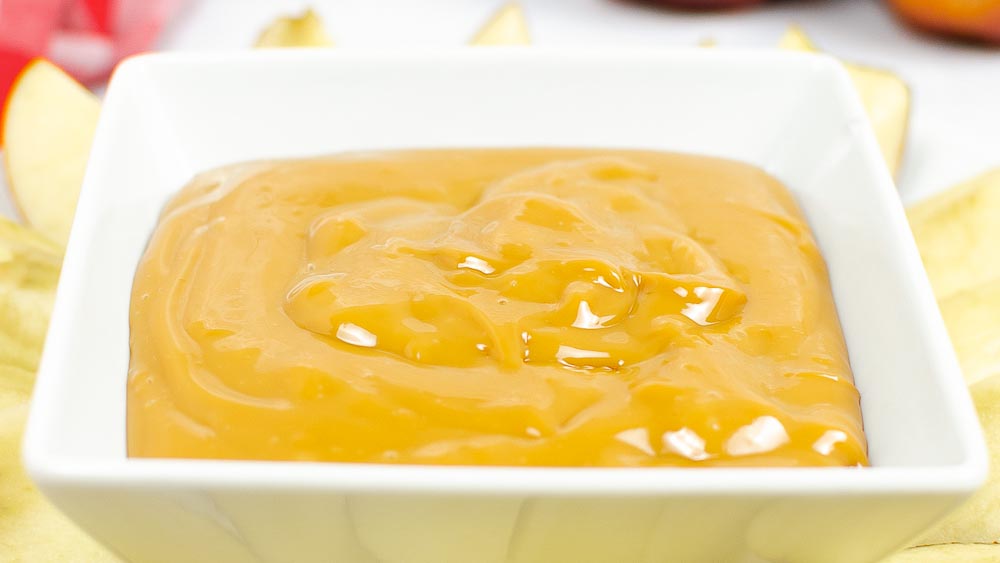
Cook at high pressure for 35 minutes for a thick, spreadable dulce de leche with a deep golden color. This standard time works well for most recipes and creates a rich caramel flavor.
Cooking time options:
| Consistency | Cooking Time | Best Uses |
|---|---|---|
| Pourable | 30 minutes | Coffee drinks, drizzling |
| Spreadable | 35 minutes | Filling cakes, spreading on toast |
| Firm | 40 minutes | Stuffing cookies, candies |
Reduce the cooking time by 5 minutes for a lighter color and thinner texture. Increase the time for a darker, thicker result.
After cooking, use a quick release and carefully remove the hot cans with tongs. Let the cans cool completely on a rack before opening.
Finishing Touches and Storage
Once the pressure cooking finishes, proper cooling and handling ensure the homemade dulce de leche stays smooth and safe to eat. Storing it correctly keeps the sweetened condensed milk transformed into caramel fresh for weeks.
How to Safely Open and Cool
The cans will be extremely hot after pressure cooking and require careful handling. Use tongs to remove each foil-wrapped can from the Instant Pot, placing them on a wire cooling rack.
Let the cans cool at room temperature for at least 2 hours before removing the foil. Opening hot cans creates a burn risk and can cause the caramel to splatter.
The dulce de leche continues to thicken as it cools. For best results, wait until the cans reach room temperature completely before unwrapping and opening them.
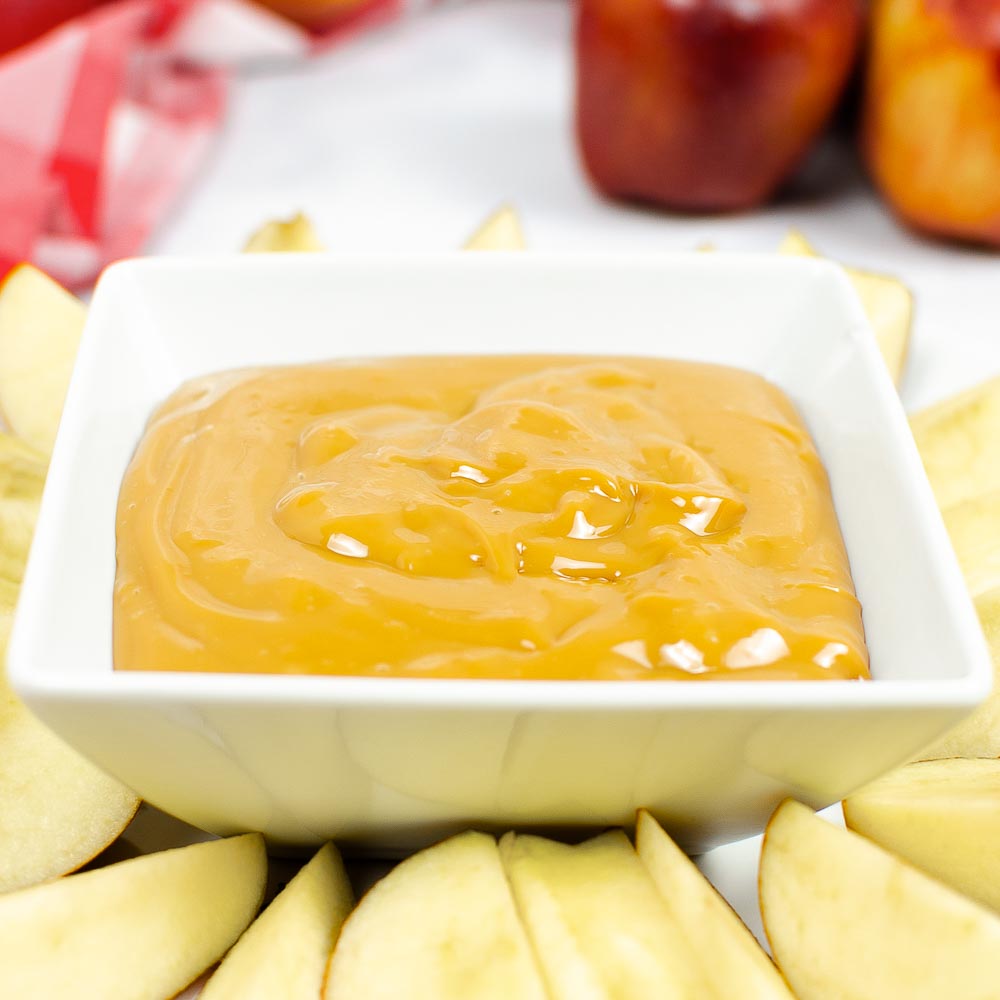
Achieving Smooth Texture
The dulce de leche should have a thick, creamy texture when cooled. If lumps appear, transfer the caramel to a bowl and whisk vigorously until smooth.
A hand mixer or immersion blender works well for stubborn lumps. Slightly grainy texture sometimes occurs from sugar crystallization.
Warming the dulce de leche gently in a double boiler while stirring can help dissolve crystals. Adding a teaspoon of water and stirring thoroughly also smooths out the consistency without changing the flavor.
Storage Recommendations and Shelf Life
Store homemade dulce de leche in an airtight container or glass jar in the refrigerator. It keeps fresh for up to 3 weeks when properly sealed and refrigerated.
The caramel thickens when cold, so let it sit at room temperature for 15 minutes before using.
Freezing extends shelf life up to 3 months. Pour the dulce de leche into freezer-safe containers, leaving half an inch of space at the top for expansion.
Thaw frozen caramel in the refrigerator overnight. Stir well after thawing to restore the smooth texture, as some separation may occur during freezing.
Serving Suggestions and Dessert Ideas
Dulce de leche works as both a topping and filling for many desserts. It pairs well with fresh fruit and cold treats.
The rich caramel flavor adds depth to simple dishes and elevates more complex recipes.
Toppings and Fillings for Cakes and Pastries
Homemade dulce de leche spreads easily between cake layers to create a moist, flavorful filling. It works particularly well with vanilla, chocolate, or coconut cakes.
Bakers can thin it slightly with milk or cream if needed for easier spreading. The caramel sauce fills cream puffs, eclairs, and donuts without being too runny.
It also serves as a glaze when warmed gently. Many people spread it on croissants, danish pastries, or sweet rolls for breakfast.
Dulce de leche can be piped into cupcakes using a pastry bag fitted with a round tip. Simply insert the tip into the center of each cupcake and squeeze gently.
For tarts and pies, a thin layer on the bottom creates a caramel base before adding other fillings.
Pairings with Fruit, Ice Cream, and Beverages
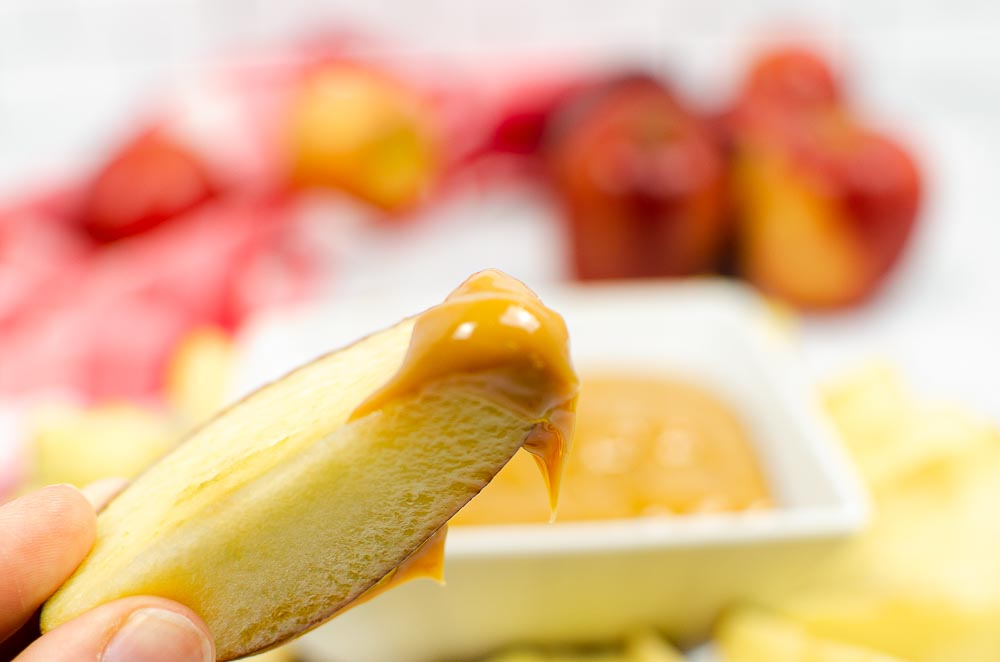
Fresh apple slices and banana pieces taste great when dipped in dulce de leche. Strawberries, pears, and peaches also complement the caramel flavor well.
The sauce can be drizzled over fruit salads for added sweetness. A spoonful of dulce de leche over vanilla ice cream creates a simple but satisfying dessert.
It also works as a sundae topping alongside whipped cream and nuts. Some people swirl it into milkshakes or blend it with ice for frozen drinks.
The caramel sauce enhances coffee drinks when stirred into lattes or cappuccinos. A tablespoon in hot chocolate adds richness.
It dissolves easily in warm beverages but can be thinned with a small amount of hot liquid first if needed.
Creative Uses for Caramel Sauce
Dulce de leche can be sandwiched between cookies to make filled treats. Graham crackers, shortbread, and sugar cookies all work well.
The filling firms up slightly when refrigerated, making the cookies easier to handle. The sauce serves as a dip for pretzels, churros, or biscotti.
It also spreads on toast, waffles, or pancakes as an alternative to syrup. Some cooks layer it with yogurt and granola for parfaits.
Homemade dulce de leche can be mixed into cheesecake batter before baking or swirled on top.
It adds flavor to rice pudding, bread pudding, and flan. The caramel sauce also fills crepes or drizzles over baked apples for a warm dessert.
Frequently Asked Questions
Making dulce de leche in an Instant Pot raises common questions about alternative methods, timing, ingredient substitutions, safety concerns, and slow cooker adaptations.
How can I create dulce de leche in an Instant Pot without using a can?
Cooks can pour sweetened condensed milk directly into a heat-safe jar or dish instead of using the original can. The container must be oven-safe and able to withstand high heat and pressure.
A mason jar works well for this purpose. The jar should be covered tightly with aluminum foil to prevent water from entering.
Place the jar on the trivet inside the Instant Pot and add water until it reaches halfway up the sides. Cook at high pressure for 35 minutes, then use a quick release.
This method produces the same results as cooking in the can. The dulce de leche will have a thick, creamy texture once cooled.
What is the recommended cooking time for dulce de leche in a pressure cooker?
The standard cooking time is 35 minutes at high pressure. This timing creates a thick, caramel-like consistency that works well for most recipes.
For a lighter, thinner dulce de leche, reduce the cooking time to 25 minutes. For a darker, thicker version, increase the time to 40-45 minutes.
The pressure cooker takes about 30 minutes to reach full pressure before the cooking cycle starts. Always use a quick release when the timer goes off.
This stops the cooking process and prevents the dulce de leche from becoming too dark or thick.
Can you make dulce de leche from coconut milk in an Instant Pot, and if so, how?
Sweetened condensed coconut milk can replace regular sweetened condensed milk in this recipe. The process remains the same as with dairy-based condensed milk.
Cover the can with foil, place it on the trivet, add water, and cook at high pressure for 35 minutes. The coconut version will have a slightly different flavor and may be a bit thinner than traditional dulce de leche.
It offers a dairy-free option for those who avoid cow’s milk. The cooking time stays at 35 minutes for best results.
Is it safe to put condensed milk directly into an Instant Pot to make dulce de leche?
Sweetened condensed milk should never go directly into the Instant Pot without a container. The milk must stay in its original can or be transferred to a heat-safe jar.
This prevents the milk from burning on the bottom of the pot. The can or jar must be covered with aluminum foil to keep water out during cooking.
Water goes around the container, not mixed with the milk. This indirect heating method is what creates the caramelization.
Always place the container on a trivet so it doesn’t touch the bottom of the pot. This setup ensures safe, even cooking throughout the process.
What are some tips for making a successful dulce de leche in a slow cooker?
A slow cooker takes 8-12 hours to make dulce de leche, much longer than an Instant Pot. Place unopened cans of sweetened condensed milk on their sides in the slow cooker.
Cover the cans completely with water, keeping at least 2 inches of water above them. Cook on low heat for 8-10 hours, checking every few hours to add more water if needed.
The cans must stay covered with water at all times to prevent overheating. Never let the water level drop below the tops of the cans.
After cooking, use tongs to remove the hot cans and let them cool completely before opening.

Dulce de Leche
Equipment
- 1 pressure cooker
Ingredients
- 2 14 oz. sweetened condensed milk canned
Instructions
- Open 2 cans of sweetened condensed milk and cover each one tightly with tin foil.

- Place the trivet in the Instant Pot and set the foil-wrapped cans on top.

- Carefully pour water into the pot until it reaches halfway up the sides of the cans. This step ensures even heating during the pressure cooking process.
- Secure the lid, set the valve to sealing, and cook at high pressure for 35 minutes. It may take about 30 minutes to reach the right pressure due to the amount of water in the pot.
- When the cooking time ends, use a quick release. Open the lid carefully, as both steam and cans will be very hot. Always use tongs and a towel or hot pad for safety.
- Allow the cans to cool on a rack before opening.
- The dulce de leche can now be served with fruit or used in recipes.


Leave a Reply